
MENU
I’m sure everyone has had those kinds of online clothing purchases - those kinds that you either “thought” really flattered you, but it looked slightly off when donned on when you reached home. The clothes that had this certain shape and fit to it, only to realize it was only due to the lighting in the store and the overly photoshopped model in the little picture on their store’s website.
Usually when trying on clothes in a store, there will always be that little small detail that doesn’t fit quite right. But don’t worry, not everyone’s body is a certified standard shelf rack size, that is why being proficient in a skill such as alteration is so valuable! This is why learning the skill of alteration is so important. Recently, I attended the Basic Alteration Techniques sewing class. Look out for more of my blog posts as I will be attending more classes.

The main learning objectives were to perform simple alterations on knit garments, determine the alterations required after fit evaluation and pinning, transfer the pinning on garment into alteration markings, alter the garment based on markings using appropriate sewing techniques and check measurement conformance after.

Prior to this lesson, I had no knowledge of fabrics and textiles. Fabric is made by various methods like weaving, knitting, knotting, chemically using gluing, bonding, or melting together and mechanically tangling the fibres together (felting). A basic but crucial understanding of fabric is that there are 3 types, knitted, woven and non-woven.
I had the joy of experiencing my first class with our TaF.tc trainer, Alan Tan! He was very friendly and knowledgeable throughout the class and was very receptive to questions asked by the students.
Here’s what the first day of class looked like:
We were given a domestic sewing machine and a little red bag with all the sewing supplies. What sewing supplies were provided? Scissors, French Curve, Ruler, Measuring Tape, Pins and a Sewing Tool kit! There were quite a few pieces of fabric for us to test our seams and stitches on for practice before we actually alter our actual garments.
Using the right size will improve your sewing and reduce thread breakage. Usually we will use size 11 needle, if there isn’t any size 11 needle, size 10 or, size 12 needle is fine too. We were given 7 different footers in the sewing tool kit.


.jpg)
There are many kinds of threads available in the market like polyester, cotton, silk, linen, topstitch, jeans, invisible thread, wash-away thread and many more. In the class, our trainer showed us the basting thread, jeans thread and polyester thread which we normally use.
The basting thread is special because you can easily tear it into two if you want to be fast at tagging. It can be used for tacking by hand to make temporary stitches and keeping seams in place to make it easier to sew afterwards using a sewing machine. This is especially good for mock ups for easy removal of stitches to alter designs. Do you know that most threads have a shelf life of 2 years? This is why the thread gets “hairy” if it is stored away for a long time, this is actually due to oxidation

Here’s a little guide on how to pin and mark the T-Shirt you want to alter and take in. After pinning the shirt and determining how much you want to take in, use a piece of chalk to mark out the lines using a French Curve.


For pants, normally the front will be tighter than the back and the back side will have a little more excess fabric. You will need to find where the knee is by folding the pants in half to the original hemline. After marking how much you want to take in, then you will sew it down, trim away the excess and finish it off with an overlock stitch.
.gif)
.gif)
Trim the pants, first fold, second fold, then use a hammer to hit the side seam (usually for thicker materials like jeans) edgestitch, for jeans because it is too thick, you can high lever foot or use leftover material from the jeans and slot it in so jackup the level as jeans one side is higher and one side is lower, skipped stitches. Topstitching find back the same color thread (usually done on the right side of the garment)

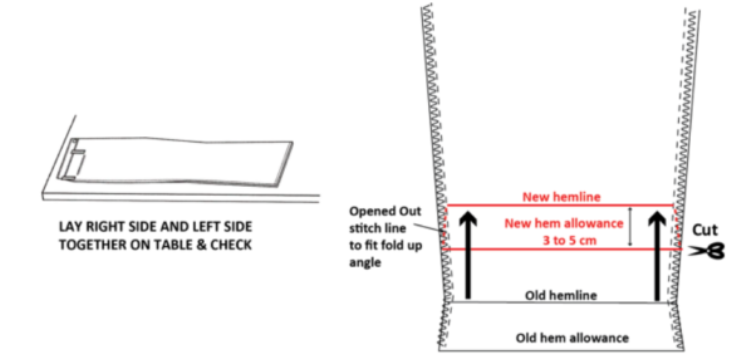
For pants, usually it is more advisable to take in both sides of the pants as it is much more evenly distributed. For skirts, a good tip to note is to always cut with a curve, following the original hem’s design. Generally for alteration, you will always sew first before unpicking, so when the fabric moves and the fabric will not unravel.

We learnt the different seam finishes such as flat felled, french seam, closed, mock overlock.
An interesting thing Alan showed us was the walking foot. This is a solution for shifting fabrics, usually when using the footers that originally come with the sewing machine. A regular presser foot pushes against the fabric as the feed dogs are trying to move the fabric towards the back of the machine while the walking foot pushes with the feed dogs. This is especially useful for stretchy fabric, quilts and slippery fabric.
A coverstitch machine is a specialized type of sewing machine that adds a professional finish to knit fabrics and activewear projects. The secure and stretchy stitch it creates is often seen on t-shirts, leggings, and elastic bindings. It looks like this.
.jpg)
The coverstitch machine really wow-ed us all! The whole class gasped when Alan flipped the shirt to reveal the underside.
Look at the difference between the mock overlock machine and the coverstitch machine, wait for the turning of the t-shirt to see the back side of the stitch!
.gif)
An overlock machine or serger can trim, stitch, and overcast seams as they sew. I managed to use the machine for my dress! The overlock machine creates a sews a seam and a seam finish, all at the same time.
.jpg)
Since the coverstitch machine is so expensive (over 2000 dollars), if you have a sewing machine you can use zigzag stitches to mimic the same effect using both a narrow zigzag stitch and a wider zigzag stitch. There is an interesting reason why the zigzag stitch is used for t-shirts, especially dry fit t-shirts that we Singaporeans often love to wear. It is because it is stretchy and if we use any other stitches, once pulled, the thread will loosen! What an interesting fact!

How do we do a mock overlock stitch? It is the combination of a straight stitch and a zigzag stitch. Or both a narrow zigzag stitch and a wider zigzag stitch. Why zigzag stitch? This is because the zigzag stitch will stretch together with the stretchy fabric! If you use a straight stitch on a stretchy fabric, it will cause the material to fray.
.gif)
Alan had also made some mockup examples of the Slipstitch, Hemming and Herring Bone stitch for us to feel. Hemming is securing the fabric in place while also covering the raw edge and preventing it from unraveling. Our trainer Alan told us that he uses these hand sewing techniques (slip stitch) for his couture pieces, especially on the insides of expensive gowns.Notice how for the Hemming stitch, you can’t see the stitch on the outside, it is because you are using the tip of the needle to pick up a few threads of the fabric. All the samples you see above are all hand sewn by our trainer.
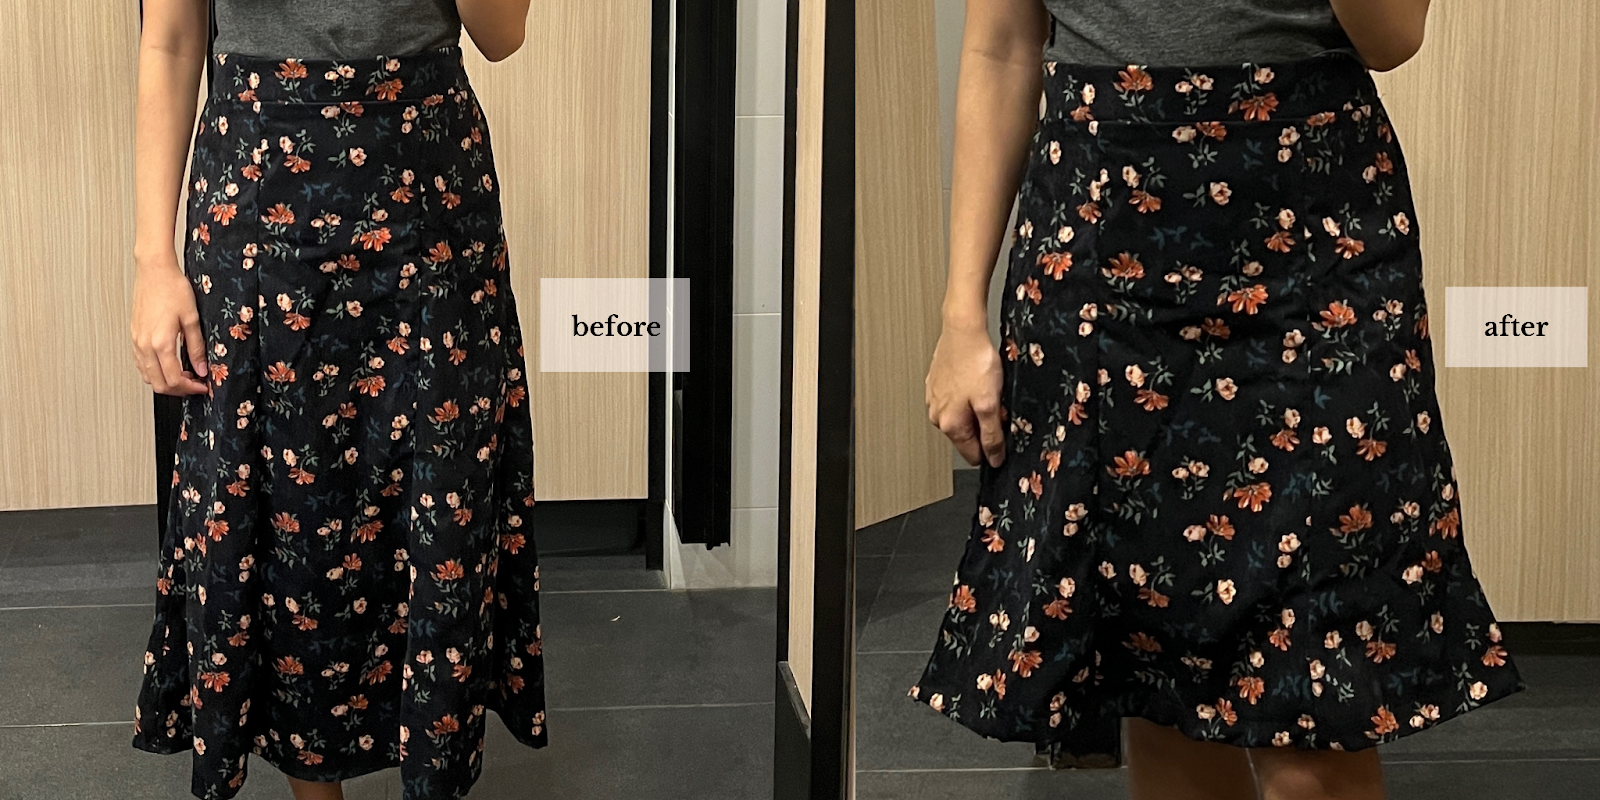
Truth to be told, this was actually my first time sewing using a domestic machine. I used to have a sewing machine at home, but it was a long time ago. Even being a first timer, I managed to alter this skirt on my own! It looked oversized before but after alteration, it fits perfectly! Although the finish isn’t perfect, I am glad to call this piece my own! For an ultimate beginner, I think it’s still considered passable.

.gif)
It was a wonderful experience, and I feel like I’ve learnt alot during this short 2 days course! I am more confident when altering clothes now.
In just a short span of two days, the Basic Alteration Techniques sewing class provided me with a solid foundation and boosted my confidence in the world of garment alterations. I now feel equipped to tackle clothing pieces that require adjustments and improvements. I highly recommend this class to anyone interested in sewing, as it offers a hands-on experience that can truly transform the way you interact with your wardrobe.
If you’re interested in sewing and want to get a hands on experience,come join our Basic Alteration Class or call 6011 8066 to book a lesson for yourself!
Oops! Something went wrong while submitting the form


